Classic French Jacket
I've always wanted to make a classic French jacket using as many traditional techniques as possible. The opportunity arrived when I finished work and had time to devote to making one.
Here's the story of my Linton Tweed jacket.

I went to a sewing show and was so lucky to find two identical skirt lengths from Linton Tweeds. The fabric definitely had some character and was incredibly fluid. It's woven on neutral cotton warp threads with three decorative threads and braid for the weft, all cellulose based, either cotton or rayon and a copper metallic. At home I had some charmeuse that had been in my stash since Janet Reger had closed her factory in the local town of Wirksworth. This would make the ideal lining.
If the jacket was to made to the exacting standards of a Paris atelier I would need to do some research. I had a basic understanding of how the jacket would be made and as I have a collection of Threads magazine I knew there had been articles by Susan Khalje, an amazing couture sewer. Claire Shaeffer also writes for Threads and has a number of designs for jackets produced by Vogue Patterns. One of her Couture Sewing books is The Couture Cardigan Jacket - Sewing secrets from a Chanel collector, so I bought that as well.

Choosing the right pattern would be important and I decided on Vogue 8991 by Claire Shaeffer as it wasn't too boxy and it's shaping would suit my body type. It had important features of a Chanel jacket, the front being made from two panels with a narrow side panel as well as a three piece sleeve with a functioning vent at the centre and machine quilting..............and it had a collar.


Having collected together most of the materials I needed I was ready to make a toile. At 5'2" I know I need to shorten a bodice above the waist. I copied all the pattern features including grain lines and quilting lines onto the toile. Getting the fit right at this stage is really important as the construction process is quite different to dressmaking. Once I was happy I cut up the toile exactly on the machine lines to use as my pattern.
This pattern is not for the faint hearted, it has very detailed couture instructions that have been adapted to be accessible to experienced dressmakers. As I was using 2x1m lengths of fabric I had to work out my own cutting layout. Although the fabric had very distinctive threads it wasn't going to be possible to match the design exactly, but I could see certain yarns that needed to follow across the seams. Cutting the cloth was the first major technique that was different to dressmaking.

Rather than cutting round the pattern pieces each body panel is cut as a rectangle, due to the fluid nature of my cloth I cut one layer at a time to be sure I was cutting on grain. As my fabric was so loosely woven I only cut and worked one panel at a time, otherwise it would soon disintegrate. I started with the front and using my cut up toile I thread traced on the seam lines marking the notches with stitches that crossed them. I also thread traced the quilting lines. This process was the same for each pattern piece. I cut the same sized rectangles from the Charmeuse for the lining. The front is supported by a layer of silk organza.

I would be making hand stitched buttonholes and I was concerned that the wide yarns of the fabric wouldn't hold the stitching. So before starting the jacket I experimented with making buttonholes. I discovered that using a strip of soft, knitted interfacing fused behind the buttonhole helped stabilise everything. So I marked the buttonholes and applied small pieces of interfacing to both front edges so it would support the buttons as well. I also herringbone stitched strips of selvedge from the silk organza down the front edge. These were cut to the exact length taken from the pattern tissue and will support the front edge helping it to hang straight.

All the pieces were machine quilted before joining them together. The front panel was quilted to the silk organza, whereas the rest were quilted to the lining. The quilting lines needed to be thread traced and basted through both layers to keep everything from shifting when I began machining. I tied off the machine quilting between the main fabric and the lining.

I had intended to hand stitch the darts and seams, but decided to machine due to the unusual yarns and loose weave of the tweed. I worked one body panel at a time to reduce the risk of fraying. Each piece was still a rectangle, so I matched the thread tracing along the seam lines and left the seams untrimmed until I was ready for the next process. Due to the very loose weave I kept the seam allowances to about 15mm.
Working on the ironing board allowed the layers to lie flat. I matched the lining fabric to the body fabric. Trimmed all the seams and ladder stitched lining seam being careful not to catch the body fabric. Slipping a peice of card or a ruler between the layers gives something for the needle to catch against without sewing into the outer fabric.
Click on these pictures as they scroll to see them in more detail...... I hope!
 |  |  |
|---|
Next to turn the outer edges.
The collar will be attached later so I left all the excess fabric as the more you trim the more the fabric will fray. I supported the hem with bias strips of woven cotton interfacing, tacking them in place before catching the edges with herringbone stitch. Then I turned all the edges over on the thread basted seam line and tacked about 5mm from the edge.

The edges were trimmed leaving them slightly larger than I usually would. All the edges were herringbone stitched to enclose the fraying edges. The red stitches are holding the interfacing to the fabric and the main fabric has been sewn in blue.

It took quite a while to choose the trim which had to be attached next. In the end I hand layered bought trims onto grosgrain ribbon. I decided not to trim the lower edge as I didn’t want a harsh horizontal line at hip level. To get the trim to turn at the neck edge I eased the ribbon and steamed it before attaching the other trims.

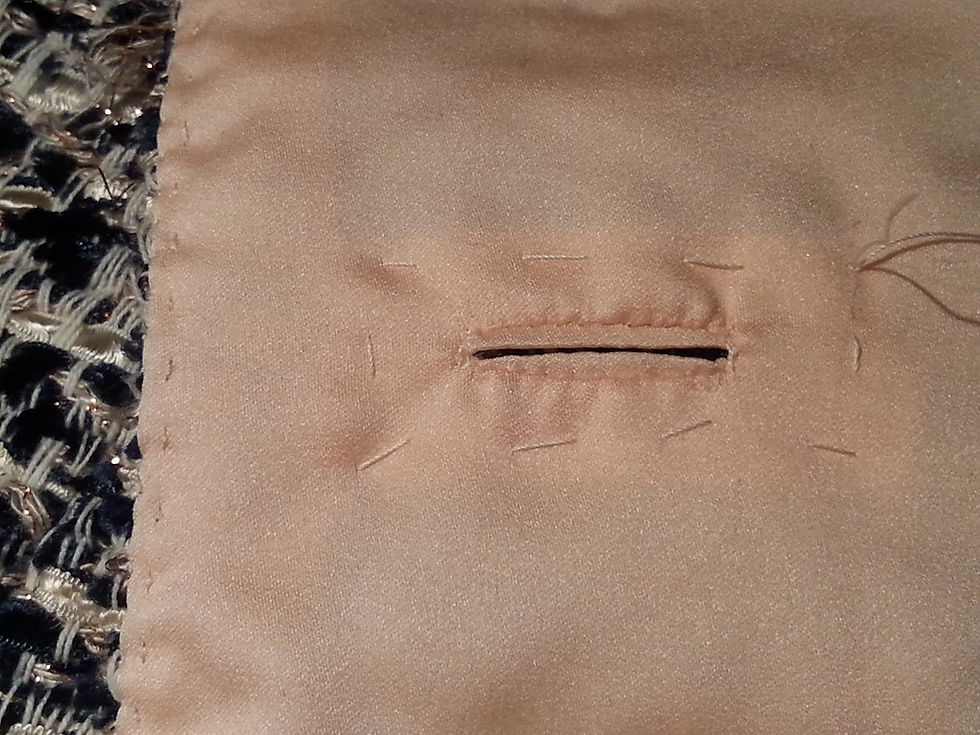
Before stitching the lining at the edges I made the hand stitched buttonholes. I had originally intended using buttonhole silk over gimp, but decided this would be too stiff. So I prepared the buttonhole opening, sealing the cut edges with clear nail varnish. You can use white glue or Fray Check. I then made the buttonhole stitch over 2 lengths of silk buttonhole thread for added body. Here's a link to my hand made buttonhole tutorial.
On the wrong side the buttonholes are backed with small welt made from the lining fabric.
The lining was then turned in so that it was just shy of the outer edge, trimmed and fell stitched in place. The lining was split at each buttonhole and slip stitched to the welts.

Describe your image
Describe your image
Describe your image
The collar was made from a rectangle cut on the grain and eased to fit the silk organza interfacing which had been cut using the collar pattern piece.
The edges were trimmed, turned and tacked to the wrong side and herringbone stitched. The trim then added to the outer edge.
The collar was matched to the neck edge of the jacket and felled in place. Only then did I trim the body fabric at the neck edge, again herringbone stitching to the inside of the collar to stop it disintegrating! The collar lining was the felled to the inside.


The jacket body is finished except for the buttons and chain for the bottom edge. Both of these took quite a lot of tracking down. In the end the buttons came from www.duttonsforbuttons.co.uk

In all the information I could find the 3 part sleeves were cut to the actual pattern pieces and then made in the same way as the body, leaving the seam from the shoulder to hem open.
Knowing how much this fabric wanted to fall apart I chose to cut rectangles and only trim when I could secure the cut edges. To keep the genuine techniques I made fully functioning sleeve buttonholes, but these didn't have the welts behind them. Finally stitching the seam and hand stitching the lining.
I have quite square shoulders so chose not to add shoulder pads. I used my tailoring knowledge to ease the sleeves into the armhole, backstitching them twice, once from each side. After trimming the sleeve lining was slip stitched to the armhole seam.


Just remembered the pockets!
I placed them lower than the orignal patterns....didn't want them too near my bust......
They were made by cutting in both the main and lining fabric. Placed right sides together and machined round leaving a gap at the bottom to turn them through, which was slip stitched closed.
Once turned the right way the trim was added to the top and the pocket was hand sewn to the main fabric being careful not to go through to the lining.


