Getting Buttons and Buttonholes in the Right Place
This article originally appeared in Sew Today magazine in 2019
Advances in sewing machine technology are making it so much easier to produce quality buttonholes. A button fastening is often on the centre front putting it directly in the eye line of anyone admiring your garment. Whether you want to make a buttonhole a design feature or an understated necessity it's essential they are positioned carefully.
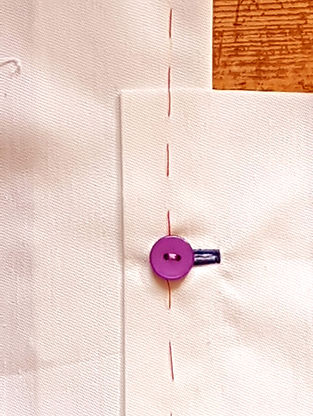
When a button and buttonhole is fastened the two layers of the garment should line up perfectly, usually with the centre front or back lines sitting on top of each other. A cuff or waistband usually has the buttonhole on the top layer with the edge lined up with the opening and the button underneath on the extension. Whichever the position the edge of the button shouldn't be over the edge of the fabric, preferably there should be a 3mm space.


The position of the buttonhole is often marked on the pattern piece by an elongated capitol I and the button with an X. Although this varies between pattern companies.
You might want to change the spacing between the buttonholes if you are using different sized buttons, want to group them in clusters and especially if you have altered the body length of the garment as the lengthen and shorten line will fall between button placement marks. I like to use a buttonhole gauge to set even spacing. The Simflex Buttonhole Gauge is available from Sew Essential

Should the buttonhole be horizontal or vertical?
The general rule is buttonholes should be horizontal so the shank that holds the button on pulls against the end of the buttonhole. If it pulls against the side the buttonhole will begin to gape and eventually come undone. A jacket or coat always has horizontal buttonholes as they're often worn over other clothes causing strain, they're usually keyhole buttonholes as the round hole makes moor room for the button shank made with thicker thread. Likewise, nightwear has horizontal ones because involuntary movement puts strain on the fastening.

Like lots of rules there are exceptions, so the choice is really yours! These are mainly dictated by the design of the garment. Vertical buttonholes work well on loose fitting garments. Blouses and shirts with a front band always have vertical buttonholes made on the centre front line, perhaps adding a small press stud can help if the blouse pulls across your bust. However; the bottom buttonhole of a good quality man's shirt is often horizontal to stop it pulling open when sitting down.

The buttonhole on a collar band is horizontal even though the ones below it are vertical.

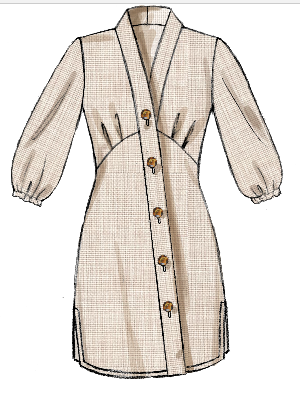
McCall's 7890 has a front band attached to an asymmetric front opening. The buttonholes aren't vertical or horizontal, but made parallel to the edges of the band.

Whichever type of buttonhole you choose to make getting the size right is really important. Many modern machines make a buttonhole to fit your button using its diameter. However if you're using a domed button the buttonhole may be too short due to the added depth of the button.
If your machine has a four step buttonhole or you want to make bound or handmade ones you need to mark not just the position, but also the length of the buttonhole so that the button passes through easily.
The size of the opening should be the same as the diameter of the button plus it's thickness. This is perfect for a bound buttonhole. For a machine or hand worked one the total length needs to be 3mm longer than the opening to allow for the bars at each end.
For a domed or spherical button measure the size by wrapping a piece of ribbon round the widest part and measure the length of the ribbon.

Vertical buttonhole and buttonholes are sewn on the centre front line or on the line which means both layers sit on top of each other accurately.
A horizontal buttonhole should start 3mm over the button placement line so when it's fastened the button shank sits against the end of the hole allowing the placement lines to sit on top of each other.
It's always worth making a practise buttonhole using exactly the same fabrics and stabiliser to check it's the right size.
Marking Buttonholes on your fabric
Marking the position of a buttonhole is essential for accurate placement. You always mark the right side of your fabric, so you need to be really sure the method you choose is going to permanently disappear. I always thread trace the button placement line(often the centre front line) on both pieces of fabric. If I'm using an automatic buttonhole I use my Simflex gauge and pins to mark the buttonhole position. For any other buttonhole I thread trace both ends and along the middle of the buttonhole where you'll cut it. As I start to stitch I pull out the horizontal tacking so it doesn't get caught in the machine stitch.

Do you place a button at the fullest part of the bust?
There are different opinions about where to place a button in relation to the bust points. This might depend on how tightly fitting the garment is and how full the wearers bust is. My opinion is this: if the button is level with the fullest point of the bust the buttonhole will take a lot of stress, but if it's evenly spaced above and below bust level the front is going to gape. Neither option is aesthetically pleasing. I prefer to place a button 2.5cm above bust level and then distribute the others evenly. You can always add a press stud or tiny hook and bar about 2cm in from the edge............
When you're making buttonholes on the sleeve of a jacket they should be horizontal to the hem.
