Cruise Your Way to a Perfect Fly Zip
- di0765
- Aug 29, 2023
- 3 min read

There it is, smack bang in the middle of your skirt or trousers and it's top stitched to draw attention to it!
There's loads of tutorials for sewing a fly zip, however this is my favourite. It's based on the method in The Complete Guide to Sewing, BUT I don't sew the seam until the end with just the bar tacks to do.
These instructions are for a 15mm seam allowance. Neaten the curved edge of the fly facing and prepare the zip guard.
For formal trousers or ones with a mock felled seam it's best to neaten the edges bore continuing with the zip.
Mark the bottom of the zip opening on both front pieces as well as the fly facing and the zip guard.


2. Left front only - press the cut edge 1cm towards the WS(just as far as the bottom of the zip opening).

3.Put the fly facing RS against the RS of the right front. Stitch 15mm. from the edge, stop at the bottom of the zip opening, secure the threads. snip to the stitching at the bottom of the zip opening. Trim the seam to 6mm.

4. Press the facing over the seam.
For formal trousers understitch through the facing and the seam allowances. Turn the facing to the inside and press.
For jeans turn the facing to the inside and press with the seam very close to the edge. Topstitch close to the folded edge.


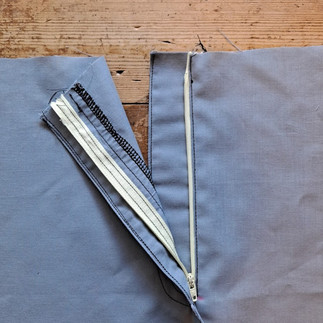
5. Open the facing out. Place the zip WS down onto the facing.
Match the edge of the zip to the seam where the facing and the fronts are joined together.
The bottom of the zip must be just above the mark for the bottom of the zip opening.
The top of the zip can extend past the top of the opening, If it's a nylon zip you can sew over it later. HOWEVER IF IT'S A METAL ZIP you need to remove the stopper and the teeth at the top with pliers. Replace the stopper so it's about 18mm below the cut edge at the top. Any higher and you'll hit it when adding the waist band.
Sew the zip to the facing.

6.Fold the facing to the inside. Very important fold the bottom of the zip tape up and pin.

7.Sew the top stitching. For formal trousers this is usually a single line, whereas jeans has 2 lines.
Use a template to mark where to machine. That can be a piece of card that you draw round and sew along the marked line. I've cut a piece of Freezer paper and ironed it in place. Machined exactly along the edge.
For the second row. Put the edge of your machine foot against the first row, adjust the needle position so it's the distance you want from the first line of stitching.
Once stitched you can see the whole length of the zip tape when you fold the fabric back.


8. This is where having a good zip foot is important. Many machines have a foot that's too wide at the back to sew past the zip pull. The one with my Janome MC6700p is perfect because it's narrow all the way to the back.
Read my tutorial about different zip feet
I have a few adjustable narrow toed zip feet for sale in my shop. They fit most low shank sewing machines.
9.Put the folded edge of the left front on top of the zip tape, with the fold close to the zip teeth.
Stitch close to the fold and stop at the mark you made at the bottom of the zip opening. Reverse or lock stitch for strength.


10. For formal trousers with an open seam. With RS together match the seam below the zip. You'll need to snip the left front seam allowance.
Stitch the seam and reverse at the top.
For a jeans zip. Fasten the zip. Overlap the the 2 layers, match the seam allowances. Topstitch the seam close to the edge.
For a mock felled seam sew a second row of top stitching.
For a felled seam, trim the right front seam allowance to 5mm. Fold the left front seam allowance to about 1cm. Tack...really important as I'd sew this from the right side if using top stitching thread.

11 Sew 2 bar tacks. One on the right side through all the layers, just below the bottom of the zip opening.
The other one is sewn through the zip guard and the fly facing.
It's hard to explain exactly where they should be, however, they should protect the zip from being stressed when you open the zip.


12 I always had problems at the bottom of the zip until I came up with this method. I've developed it from various sources and can't believe how quickly it seems to come together.


Comments