Tailoring a Woman's Waistcoat
- di0765
- Feb 22, 2024
- 9 min read
Mindful of not wanting to over make I wanted a slow sewing project for the post Xmas period. After rooting through my fabrics I remembered I had a small piece of silk/wool tweed I bought as part of a bundle from FabWorks Mill shop a few years ago. It's quite lightweight and would need some support, but I've always loved it's colours. I love both wool and silk tweed and saved this piece for something special.
I've made Burda 7769 a few times before and love the way it's designed for women's wear. Longer and less boxy than a unisex pattern

I lowered the back hem and added a vent. I only just had enough fabric, none for the front facings or under collar, so I knew I'd have to be really careful sewing these edges so the lining doesn't show.
Tailoring uses loads of hand sewing which is why it takes so long. Some stitches mark design features like seams, pockets and darts. Others hold layers of fabric in place to ensure they stay in place during construction. Most are removed, but believe me there's loads that stay in place that only the maker knows about once the garment is finished.
Marking the fabric
This is an important part of tailoring, especially for seams that might be hand finished. I mainly use thread tracing(keep reading) However tailors tacks have their use as well.
Tailors Tacks
I always use the thread double in the needle. I used to think I needed to leave long threads, but they're less likely to pull out if they're short!
is important. The smaller the stitches the more accurate they will be.
Take a small stitch through all the layers leaving thread tails....no knots
Make a second stitch in the same place leaving a loop of thread and a tread tail.
Carefully separate the fabric and carefully snip the threads leaving stitches on both layers of fabric.


This is my favoured way of marking fabric, especially seams, darts etc. Hopefully the YouTube video sort of shows how it's done. Like tailors tacks the layers are separated and the threads snipped, it leaves a line of temporary stitches. I marked the centre front line, the dart.armhole edge stitching line, pocket position and the hem fold.
I'm not sure why I added a random picture of the tailors canvas in this row of pics! I'll explain soon


The last time I made this waistcoat I used fusible tailors canvas and it worked really well. However, I'm trying to make things using stuff I already have....I only bought buttons for this project.
I did have sew in canvas which I used for the front bodice and collar. This is where tailoring really diverges from dressmaking.
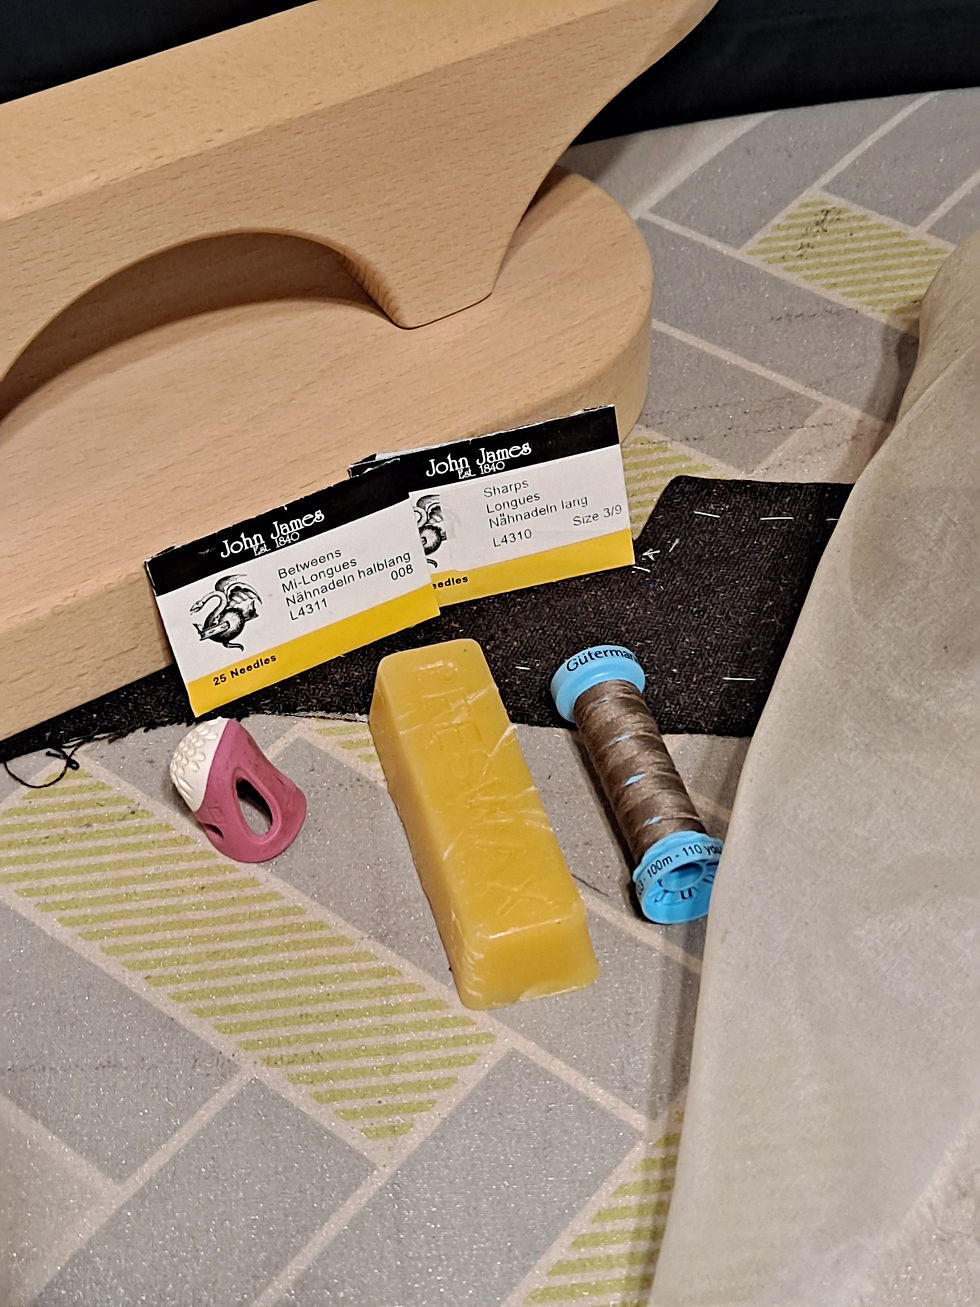
The next pic shows a few of the things I use for tailoring.
John James needles (they have true to life downloadable size charts for all their needles)...for tailoring I use betweens for fine sewing and sharps for tacking and thread tracing. With experience I can select the best needle by feel..........not sure if that's weird!
Tailors clapper is a hard wood tool put on top of a pressed seam. The wood absorbs the moisture to achieve a sharp edge. Many have shaped areas to help press collars etc.
I can't hand sew without a thimble which should fit your middle finger. I punctured the end of my finger sewing my A level pieces in the early 70s...it went septic....lesson learnt. My favourite is the one from Prym, it comes in 3 sizes and doesn't fall off, unlike metal ones I've tried. I understand they now make an adjustable one using boiling water! I've not tried it.
A press cloth. I like silk organza, it's hard wearing and I can see through it. Definitely not polyester organza, it'll melt.
Beeswax strengthens the thread and helps to stop it twisting, turning the needle a quarter turn each stitch also helps. After drawing the thread through the wax I iron it over a piece of kitchen paper.
Hand sewing thread. I like Gutermann blue reel thread, but it's getting harder to find. Gutermann make silk thread in precut lengths, but it's very expensive.
I also use a tailors ham, well actually I've got 3 of different sizes. I had one I'd bought, but it was never big enough for pressing larger areas so I set about making a bigger one and then progressed to one large enough for men's jackets. I wrote about it on Instagram
The original pattern isn't lined, it has a neck and front edge facing which the collar and revere are sandwiched between. I always intended to line mine so when I was really short of fabric and didn't have enough for the under collar or front facings I knew lining would be my saviour.
I began by making the collar, pockets and back belt.
The collar and revere has one pattern piece with a centre back seam and the notch is made by sewing a triangle. I cut the canvas without seam allowances as I don't want to catch it in when sewing the edges. First of all I hand tacked the canvas to the fabric to keep it flat.
This next technique was used throughout the canvassed pieces.
I tacked bias tape over the edge of the canvas, the tacking really close to the edge and herringbone stitched one edge of the tape to the canvas. The machine stitching is through the tape and main fabric, but not the canvas. This helps get a really crisp edge as you're not having to crease the canvas when pressing.
After trimming and turning the collar right side out I tack about 1/4" from the edge, manipulating the fabric so the seam is slightly to the underside.
Press with a cloth and lay the clapper on it to get a crisp edge. let the fabric cool and rest before moving it. It was under stitched by hand, as that's going to help stop the lining showing along the edge.


I made patch pockets with flaps. Only the flaps have a layer of canvas and both pieces are lined. I tacked the canvas in place, but didn't tape the pocket flaps because the canvas would be held in place when I topped stitched them.
To make sure the pocket lining didn't peek out at the edges I wanted the seam to roll to the underside. The easiest way to do this is to cut 1/8" off the edge of the lining. You still bring the edges together, easing the fabric as you sew. Once the allowances are trimmed and turned right side out the main fabric rolls slightly to underside. More tacking before pressing.


The front is the only piece to be canvassed and has a large lower bust dart.
Again the canvas was cut without the seam allowances and the dart are cut out as well.
The canvas was placed carefully onto the fabric matching the edges to the thread tracing. Although it's not obvious there's loads of tacking holding the canvas to the fabric. All the edges had the bias tape tacked and herringbone stitched down, including the dart.
The fourth picture shows both the wrong side and right side after the dart was sewn. I cut off the excess fabric from the dart to about 5/8. After pressing it open like a seam I herringbone stitched the edges to the canvas.
A tailors ham is really helpful, especially as a ladies waistcoat often has a more curved form. I left the bodice on the tailors ham whilst sewing something else, this helps the fabric to maintain the desired shape.


I leave all the tacking in place. In fact removing it is one of the last things I do.
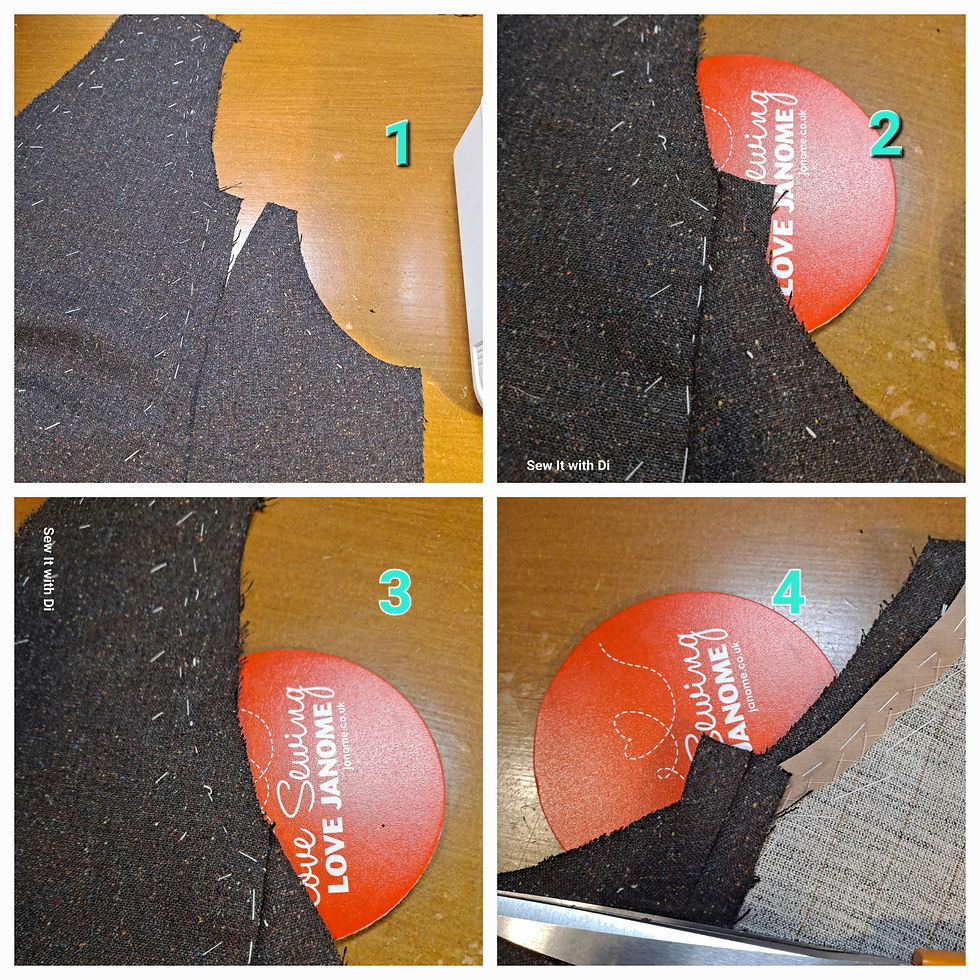
A quick word about sewing seams like mine that have this weird shape at the armholes. Mine aren't princess seams as they don't go over the bust point.
The pieces are cut so they're the same length at the stitching line. I matched my thread tracing and ended up with a right angle sticking out at the armhole(2). That's what it's supposed to be like. When the allowance is folded the other way(3) the armhole edge and my thread traced stitching lines both line up smoothly. Pic 4 shows the seam pressed open.
I decided to add a label to the back facing and couldn't be bothered to put white thread on the machine. I experimented with the different blanket stitch effect stitches on my Janome MC6700p.
I really wasn't happy with the first attempt, the second one still needs more practice at the corners!

Before sewing the pocket flaps to the front I had to buy buttons and make the buttonholes.
My machine has 9 buttonhole settings and I chose a keyhole style.
Out came my mum's old leather punch to make the hole at the end of the buttonhole. I've discovered that putting a piece of paper under the fabric makes it easier to punch fabric.
With the pockets and flaps sewn I hand stitched the button. To get the button in the correct place I used my chalk pencil through the keyhole to mark the position on the patch pocket.


I seem to have a big gap in my photos at this point. Especially as constructing the seams and adding the lining was very different to dress making. But, not easy to photograph.
The back was straight forward to sew. A centre back seam stopping at the vent and side back seams.
I stitched the shoulder seams. Then moved on to the lining.
The back lining was cut with an extra wide centre back seam so I could make a tuck to give movement ease. The front dart was sewn from the bottom and stopped 4" from the point, this is also gives ease under the bust. I call it a released dart. There's a picture later on in this article.
The lining shoulder seams were sewn and the side panels sewn to the front and back.
I tacked the collar to main fabric. Then placed the lining down right sides together and stitched the front and neck edges. Turned it right sides out and tacked round the seam before pressing. Like the other lined edges I wanted the seam to roll to the underside so the lining didn't show at the front edge. The tacking really helps keep the layers in place.
In the next photos you can see lots of tacking on the front and back. THIs is holding the lining in place before the side seams and hems are sewn. It helps stop the lining from controlling the main fabric as it can't get pulled out of shape. I do this on my ironing board with a piece of card under the fabric. The card means I can tack through the layers without sewing to the ironing board cover.
The tacking gets quite close to the armhole edge and side seams, leaving room to sew the next steps.
By the time these photos were taken I'd machined the main fabric side seams, but not the armholes, lining seams or hem.


The last time I made this waistcoat I faced the neck edge. Sewed the lining to the armholes and hand stitched the lining to the inner facing edge.
However, I needed to finish the armholes in a different way this time. Whilst the side seams are unstitched there is a way to do this by machine, but it isn't true to my desire to tailor.
I wanted to strengthen the part of the armhole that doesn't have canvas on it. Again I added bias tape over the stitching line. Tacking down both sides. I then machined round the armhole keeping the lining free.

After trimming the allowance the armhole edge was folded in on the stitching line and tacked.

The lining was trimmed and turned in round the armhole and tacked so there was a small amount of the main fabric showing.
THe lining was slip stitched to the machine stitching round the armhole.


Before sewing the lining side seams I added wide bias strips of lining in to the hem and the back vent. This adds a bit of weight to the hem and means it has more body. The strips are about 5cm wide and placed with the edge above where the top edge of the hem will be when it's turned up. The hem fold line is tacked, see first pic.
The edge of the back vent is herringbone stitched over the strip of lining.


The lining side seam is slip stitched together.
To get the hem nice and flat turn it up on the fold line and tack 1/4" from the fold. Tack again about !/2" from the cut edge. Press.
Herringbone stitch the edge through the lining strip just catching the main fabric. Don't pull this tight, it needs to be soft so you don't get a ridge on the right side.
Pic 2 shows the lining cut to the same length as the finished fabric hem. Fold up about 3/8" on the edge of the lining and place that fold just below the herringbone stitching. Pic 3 shows the lining tacked in place and then slip stitched in place. Once the tacking is removed the lining folds down covering the stitching and creates the wearing ease.
Pic 4 shows the ease and the lining slip stitched to the vent.


Nearly there.....edge stitching and buttonholes.
I hand sew the under stitching round the fronts, neck and armhole edges.
The keyholes of the buttonholes should sit on the centre front line so when the buttons settle into the keyhole they're sitting in the perfect position.


The last thing to do is remove all the tacking and give it the final press.
Here's the lining showing the added ease. I should have added a small amount of vertical ease above the vent. However as this is a waistcoat I'm unlikely to sit on the back hem, unlike a jacket or coat which is longer.


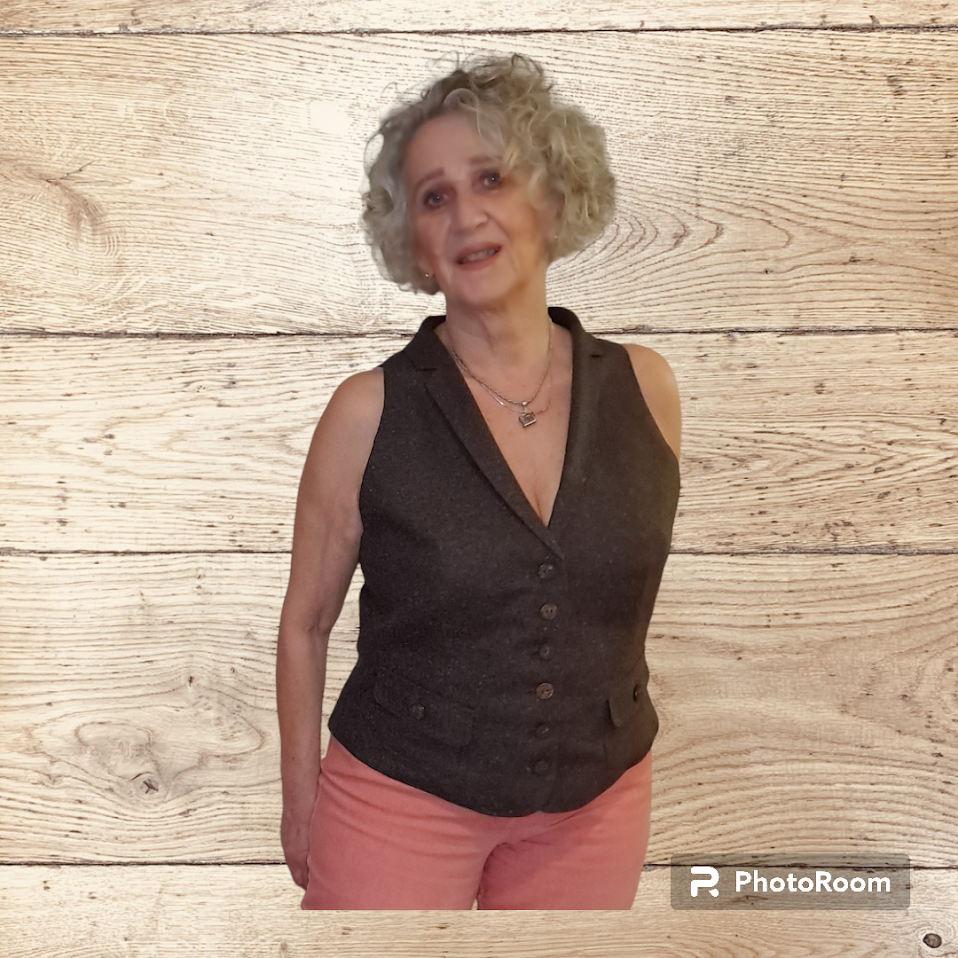
A few pics of the finished waistcoat....Edith is a bit slimmer than me these days!


Just had to show you this buckle. It's the type of thing I pick up when I see them and I think this came from a dressmaking sale in France.

I don't often do photo shoots, but felt it was worth it after the many hours put into this waistcoat.


Comments